NSX Cloud. Part 5 : Onboarding Public Workloads

NSX Cloud. Part 5 : Onboarding Public Workloads
In previous posts we have successfully deployed PCGs into AWS VPC and Azure VNET. Now it is time to start our onboarding process for the workloads. The process is similar for both public clouds. When VM gets created, we have to assign tag nsx.network=default. After this is done, there is another element now called NSX Tools (previous name was NSX Agent) that has to be installed on VM. Once both steps are completed, VM is ready to be managed by NSX-T Manager and it is called ‘managed’ VM. Let’s review another important concept called “Quarantine Policy” which instructs essentially what native security group needs to be assigned to the VM in the cloud. By default it is disabled and it is recommended settings for existing(brownfield) deployments. If you recall there are several security groups that are created during PCG installation. Those groups will now come into play.
If quarantine policy is disabled on VPC/VNET, the virtual machine doesn’t get any automatic assignment of the security group and it has been assigned by the user. In this case, we can use vm-underlay-sg which allows both inbound/outbound traffic
Note, in Azure TCP port 8888 (used by NSX Tools Management) is blocked for inbound
If quarantine policy is enabled on VPC/VNET, any unmanaged VMs (the ones that don’t have NSX Tools installed and nsx.network=default tag) will be assigned automatically default security group in AWS and vm-quarantine-sg network security group in Azure, which blocks all inbound access. Outbound access is limited to a few ports (DNS, HTTP, DHCP, TCP 5555 and 8888). The rest is blocked for outbound.
If unmanaged VM gets NSX Tools installed and required tag assigned, NSX Cloud will assign vm-underlay-sg to it.
In case if NSX Tools gets stopped for some reason, which is considered a threat, the system will be assigned again default or vm-quarantine-sg group.
Also note, that if you try to change the security group assignment when quarantine policy is enabled, that will be reverted back within two minutes to respective default and vm-quarantine-sg groups.
In case if quarantine policy is enabled and we want to have different policy for particular VM,i.e remove it from quarantine ( for example we have jump box where we don’t want to install NSX Tools, but still want to have more freedom in terms of inbound/outbound rules), we can use special vm-override-sg security group, which is not going to be reverted back to default security groups. That group has all outbound traffic allowed, while inbound traffic is limited to SSH/RDP, and ports 8888 and 6081(Overlay traffic for PCG).
Below is the list of currently supported OS for workload VMs as for the current release of 2.4
- Red Hat Enterprise Linux (RHEL) 7.2, 7.3, 7.4, 7.5
- CentOS 7.2, 7.3, 7.4, 7.5
- Oracle Enterprise Linux 7.2, 7.3, 7.4 (Unbreakable Enterprise Kernel versions not supported).
- Ubuntu 14.04, 16.04
- Microsoft Windows Server 2012 R2, 2016
- Microsoft Windows 10
We will start onboarding workloads in AWS, then move to Azure.
- We will create three test Ubuntu VMs in AWS and place two of them into compute VPC in subnets compute-1 and compute-2 (10.44.0.0/24 and 10.44.1.0/24 respectively). And third one will be created in Transit VPC in nsx-downlink subnet (172.31.20.0/24) and primarily will be used as our jumphost. I won’t be going over the installation of VMs in AWS. This is how it looks like after VM got installed:
 Note : tag has to be present: key = nsx.network , value = default ;
Security Group: vm-underlay-sg - As a basic test, we will connect to one of our compute instances and try to ping another VMs. This will validate cross VPC communication this basic test doesn’t work, please return back to part 3 and confirm transit gateway configuration.
- Now we will need to install NSX Tools into VM to be able to control it from NSX-T Manager side. Login to CSM and navigate to Clouds–>AWS–>VPCs. Click on Transit VPC and under gateway you will see section called “Agent download and installation”
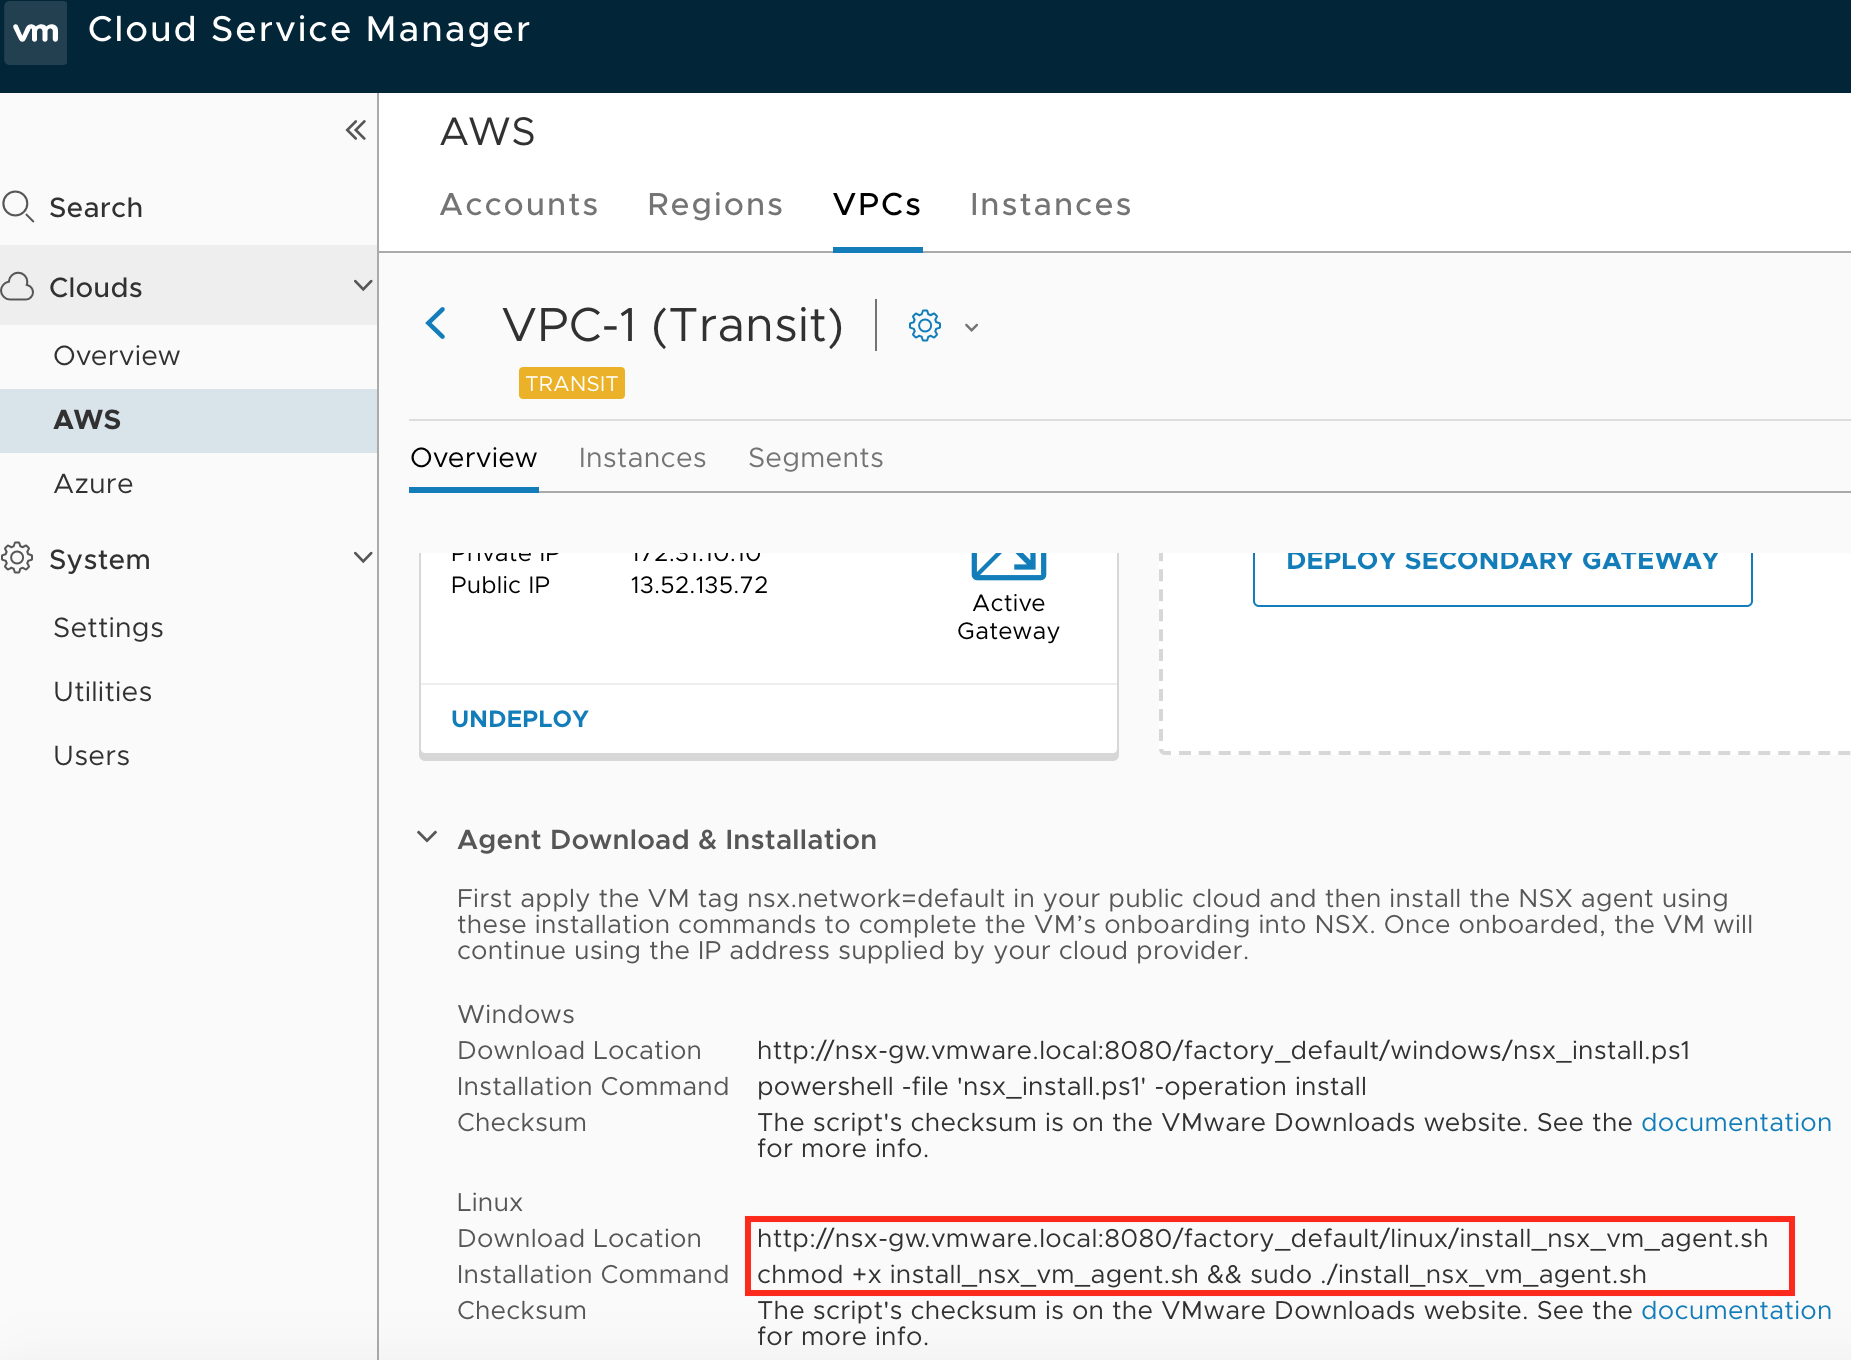
- Copy download URL and login onto each VM ( we will be only installing on two compute VMs).
 Last script output should be something like this:
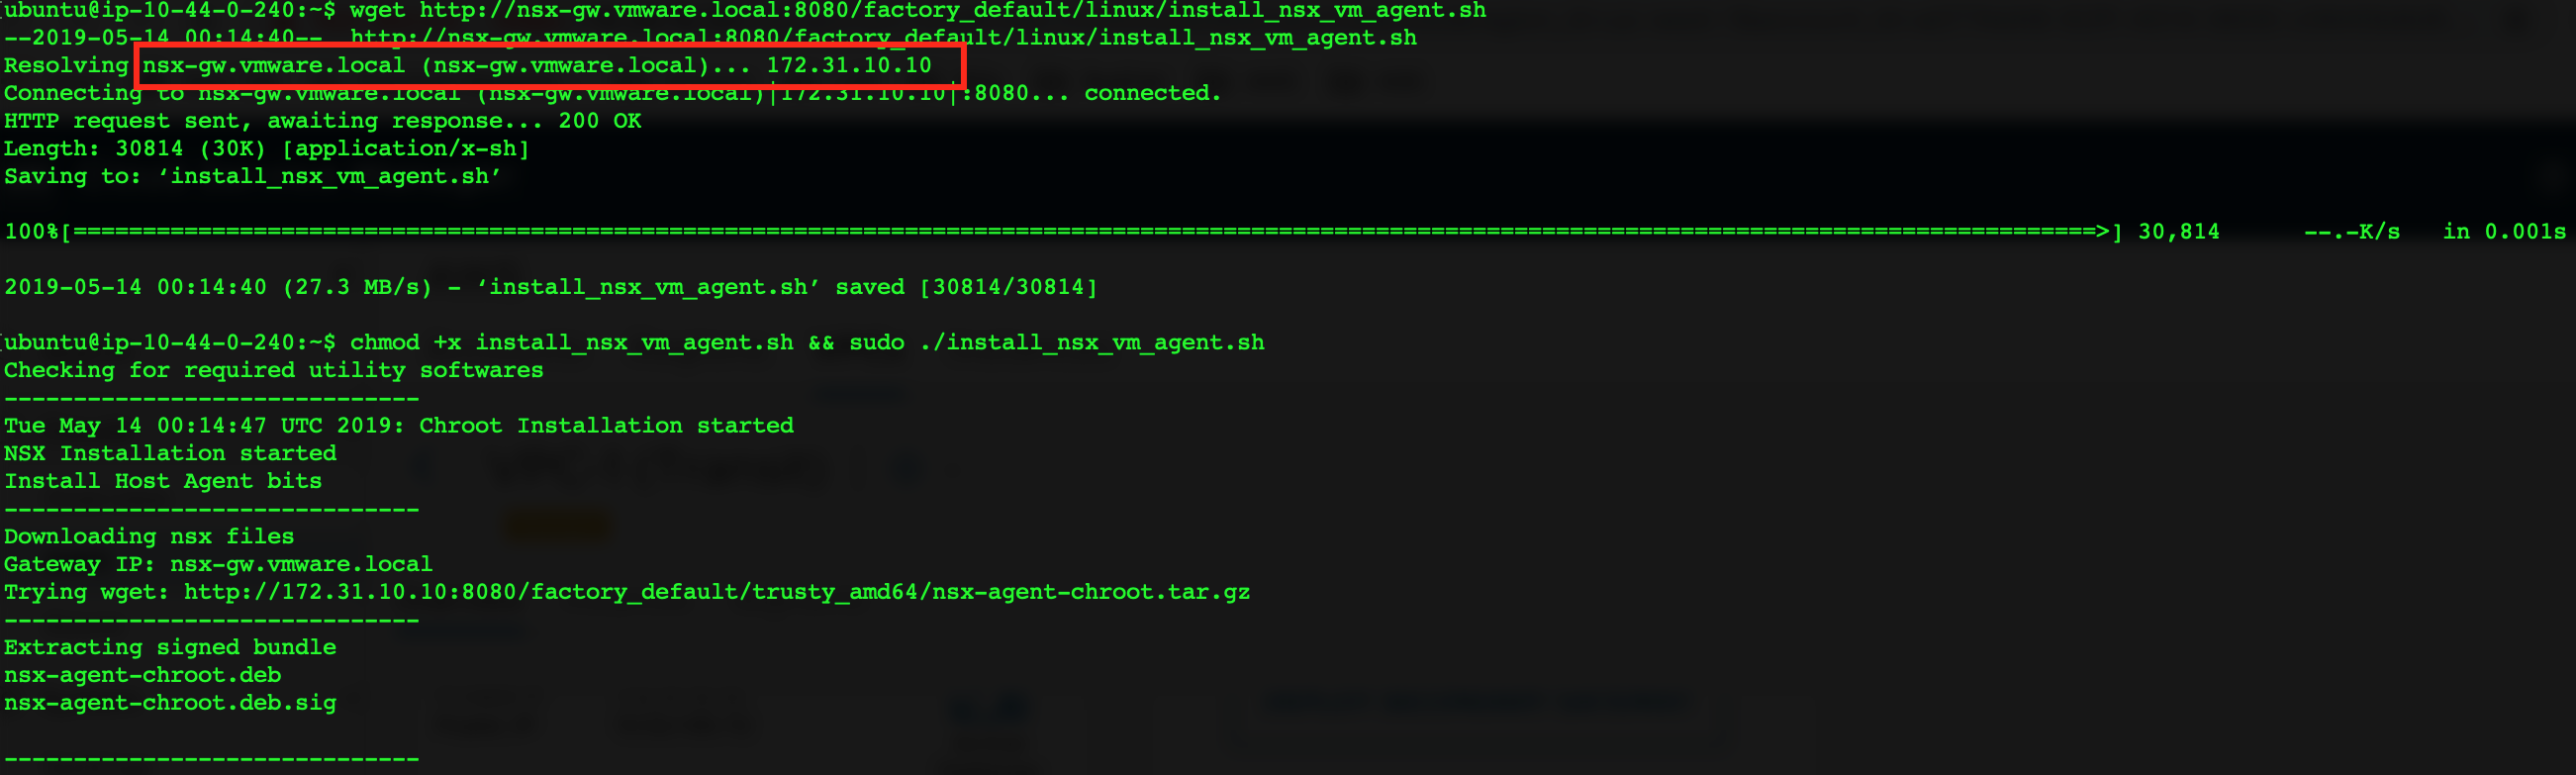
NSX Agent installation completed!!!
Starting NSX Agent service. SSH connection will now be lost.
Note that resolution of hostname to IP worked because of DNS zone and record that was created during PCG installation. This is very important to have, otherwise agent(tools) installation will fail
- Repeat the same for another compute VM and login back to CSM–>Clouds–>AWS–>Instances
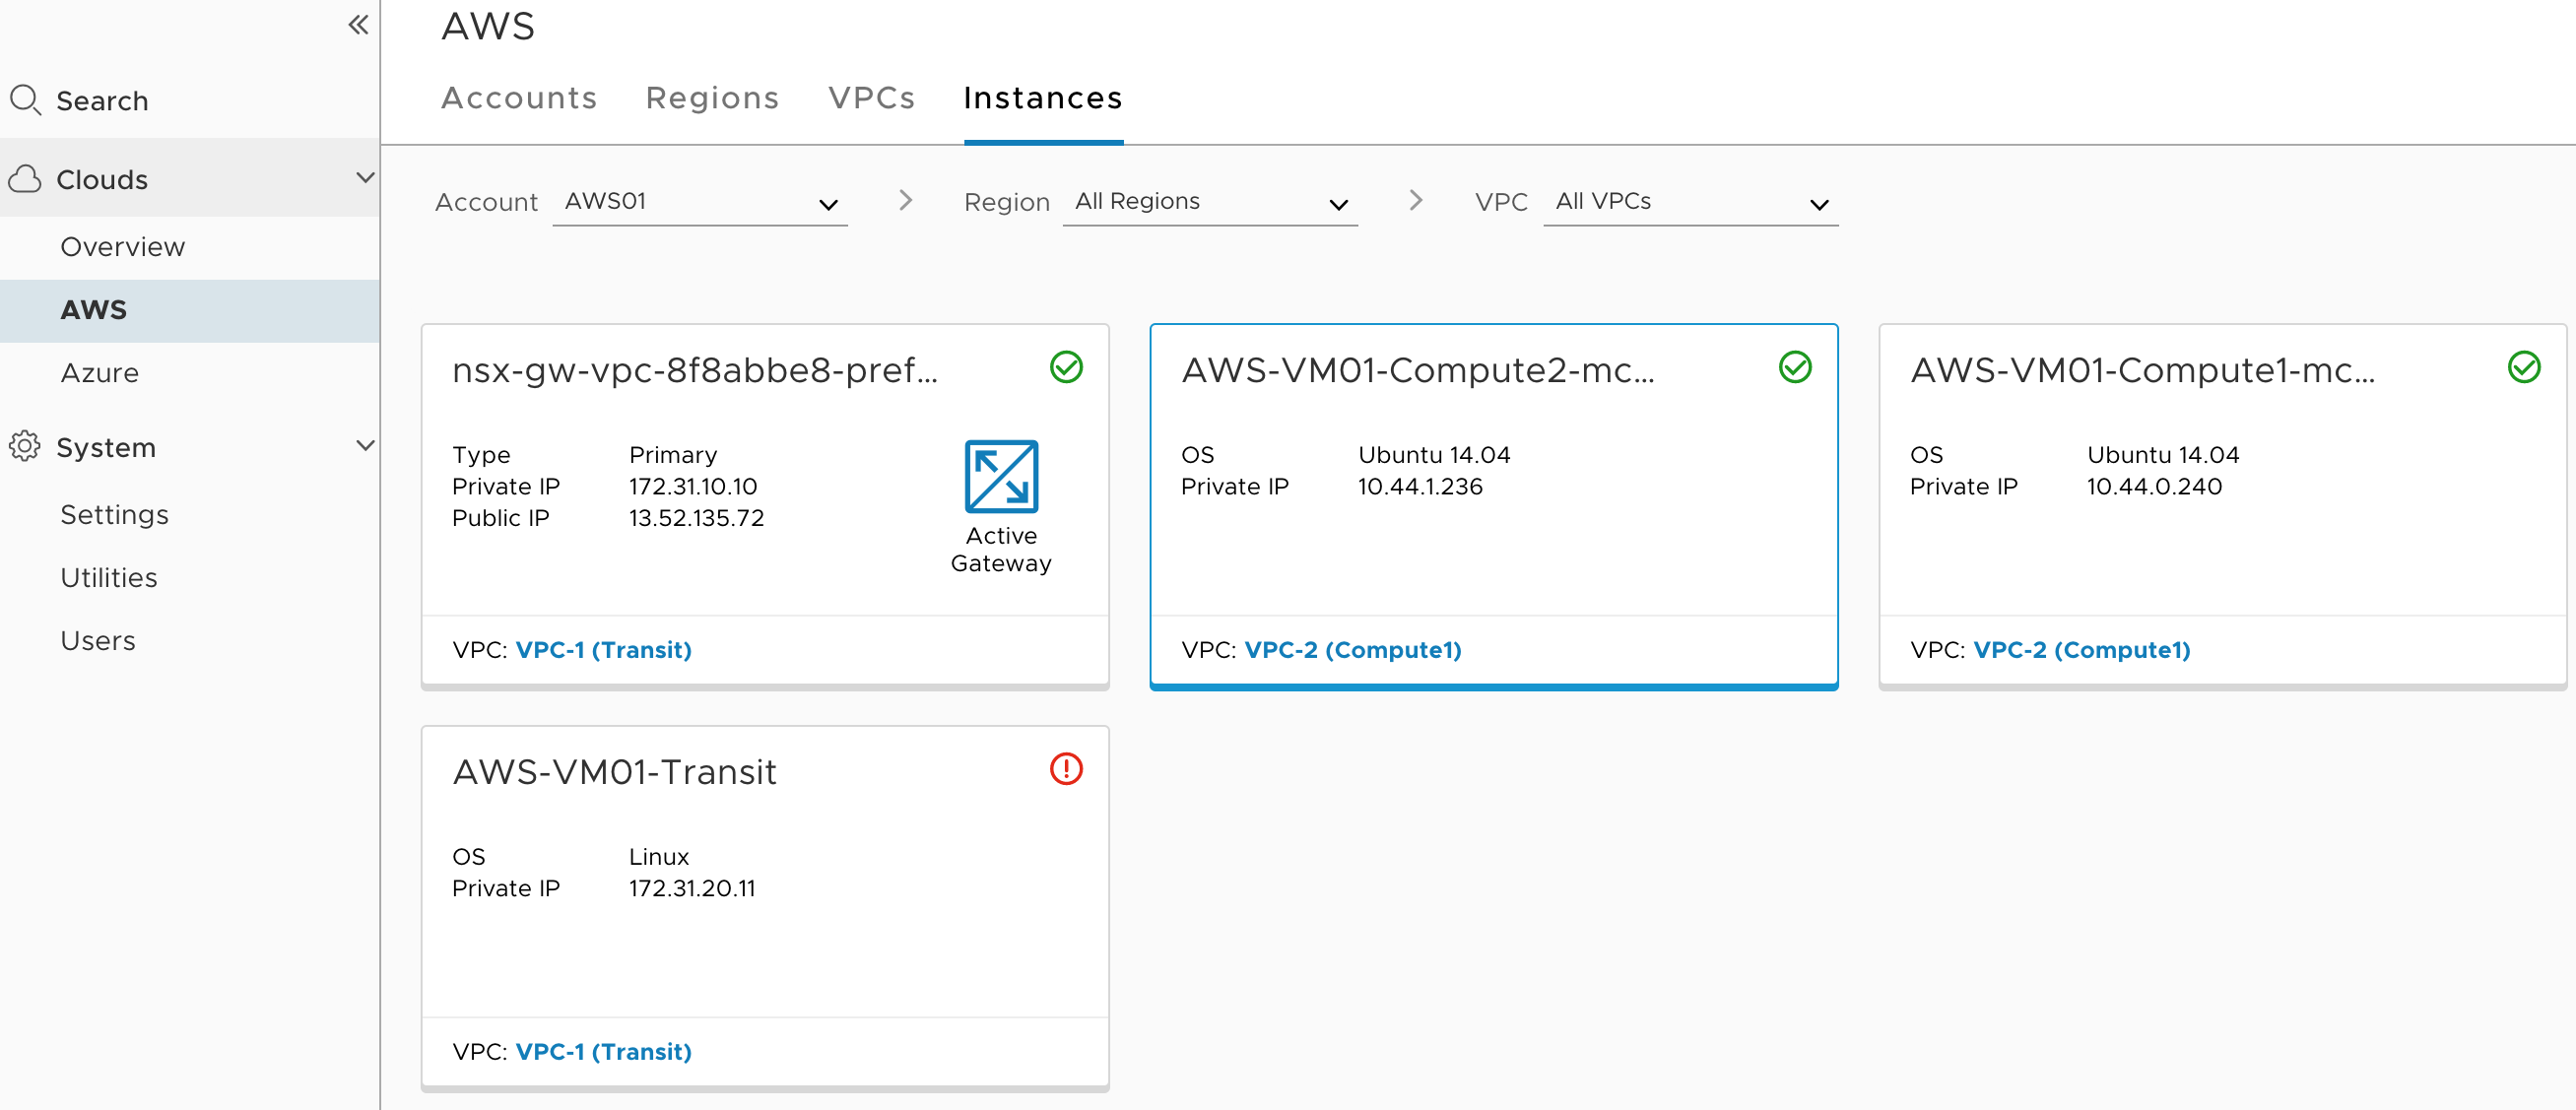 Green checkmark means that VM is now managed by NSX ( two VMs that we have installed NSX Tools). The third VM that we will be using as a jump host will be shown red checkmark, as we won’t be installing NSX Tools there.
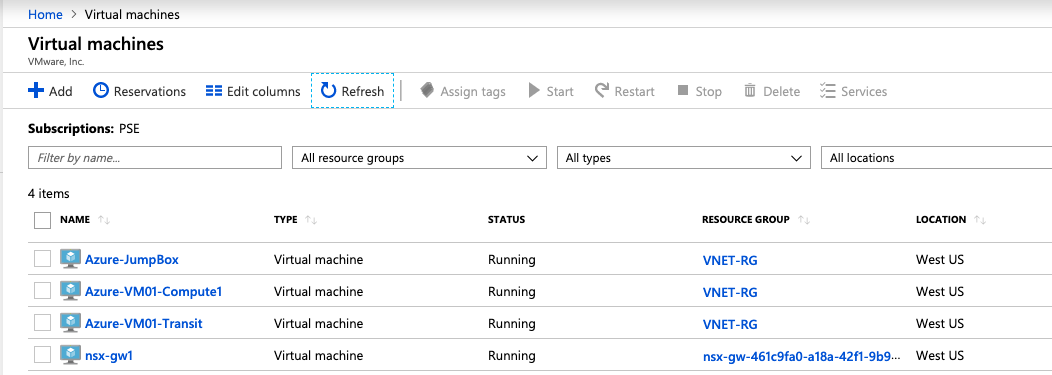
This is how to quarantine policy will work on managed/unmanaged VMs. The moment if VM gets unmanaged for some reason, NSX Cloud will assign an appropriate security group that will limit access to a particular VM as we have described at the very beginning of this part. We won’t be enabling quarantine policy, but you should now get an idea of how it will work. - Let’s login to NSX-T Manager and verify what objects do we have now. Navigate to Inventory–>Virtual Machines
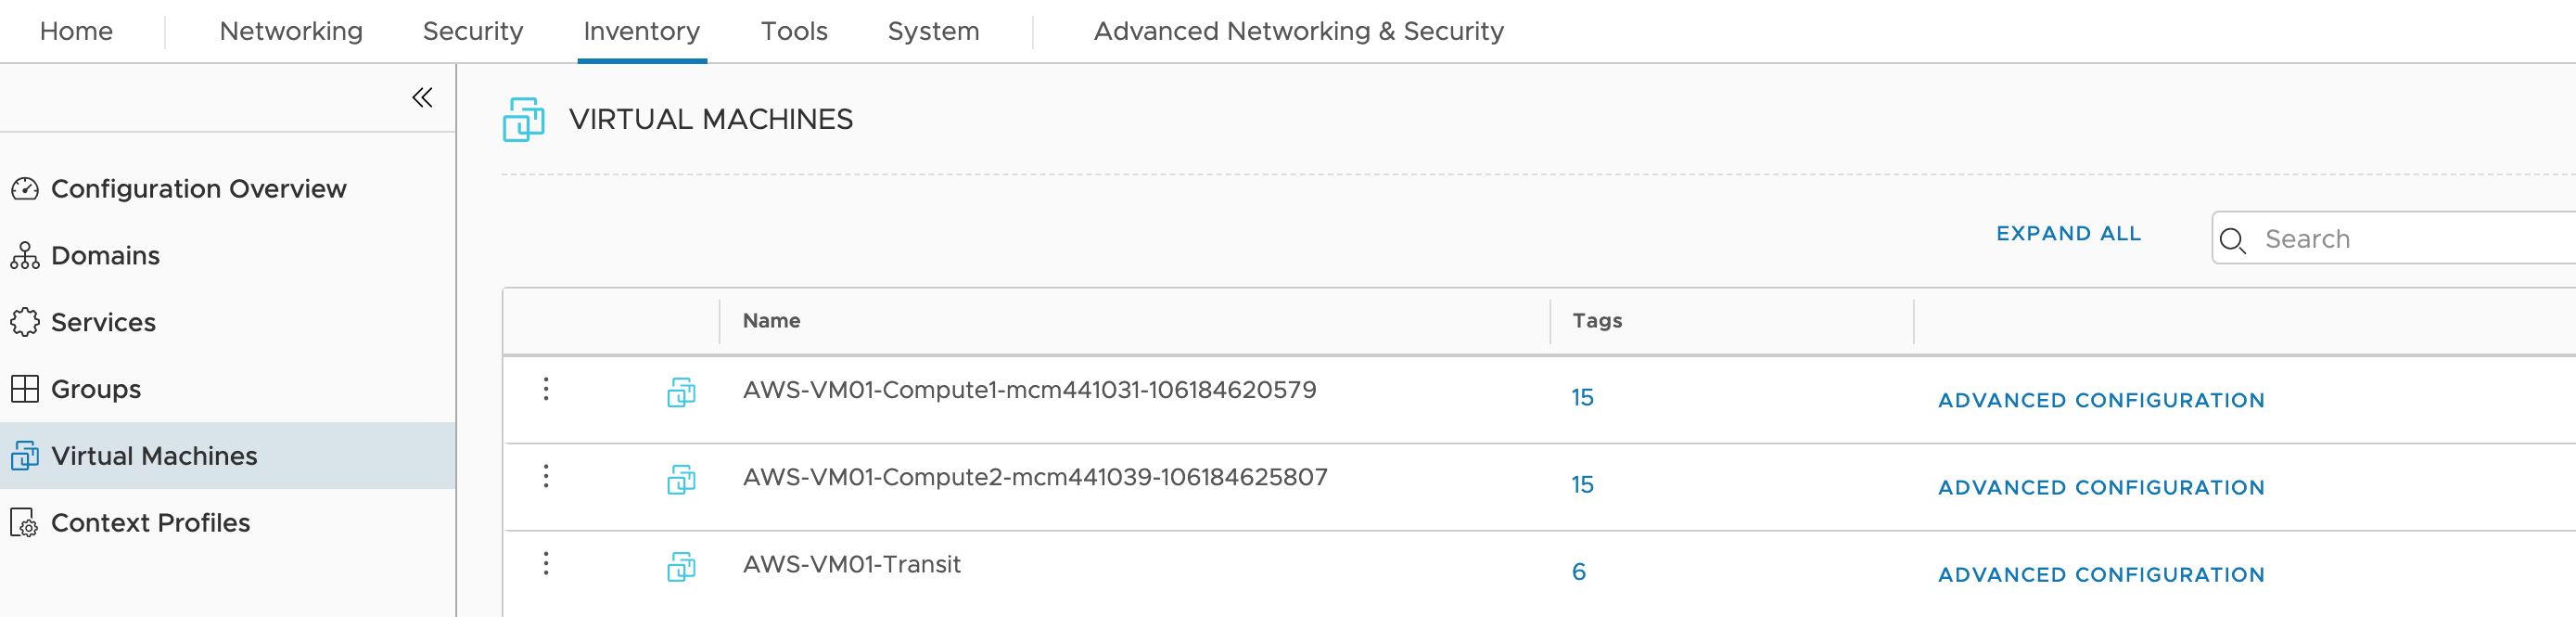 We see all three workloads that have tag (nsx.network=default)
 - Go to Networking–>Segments
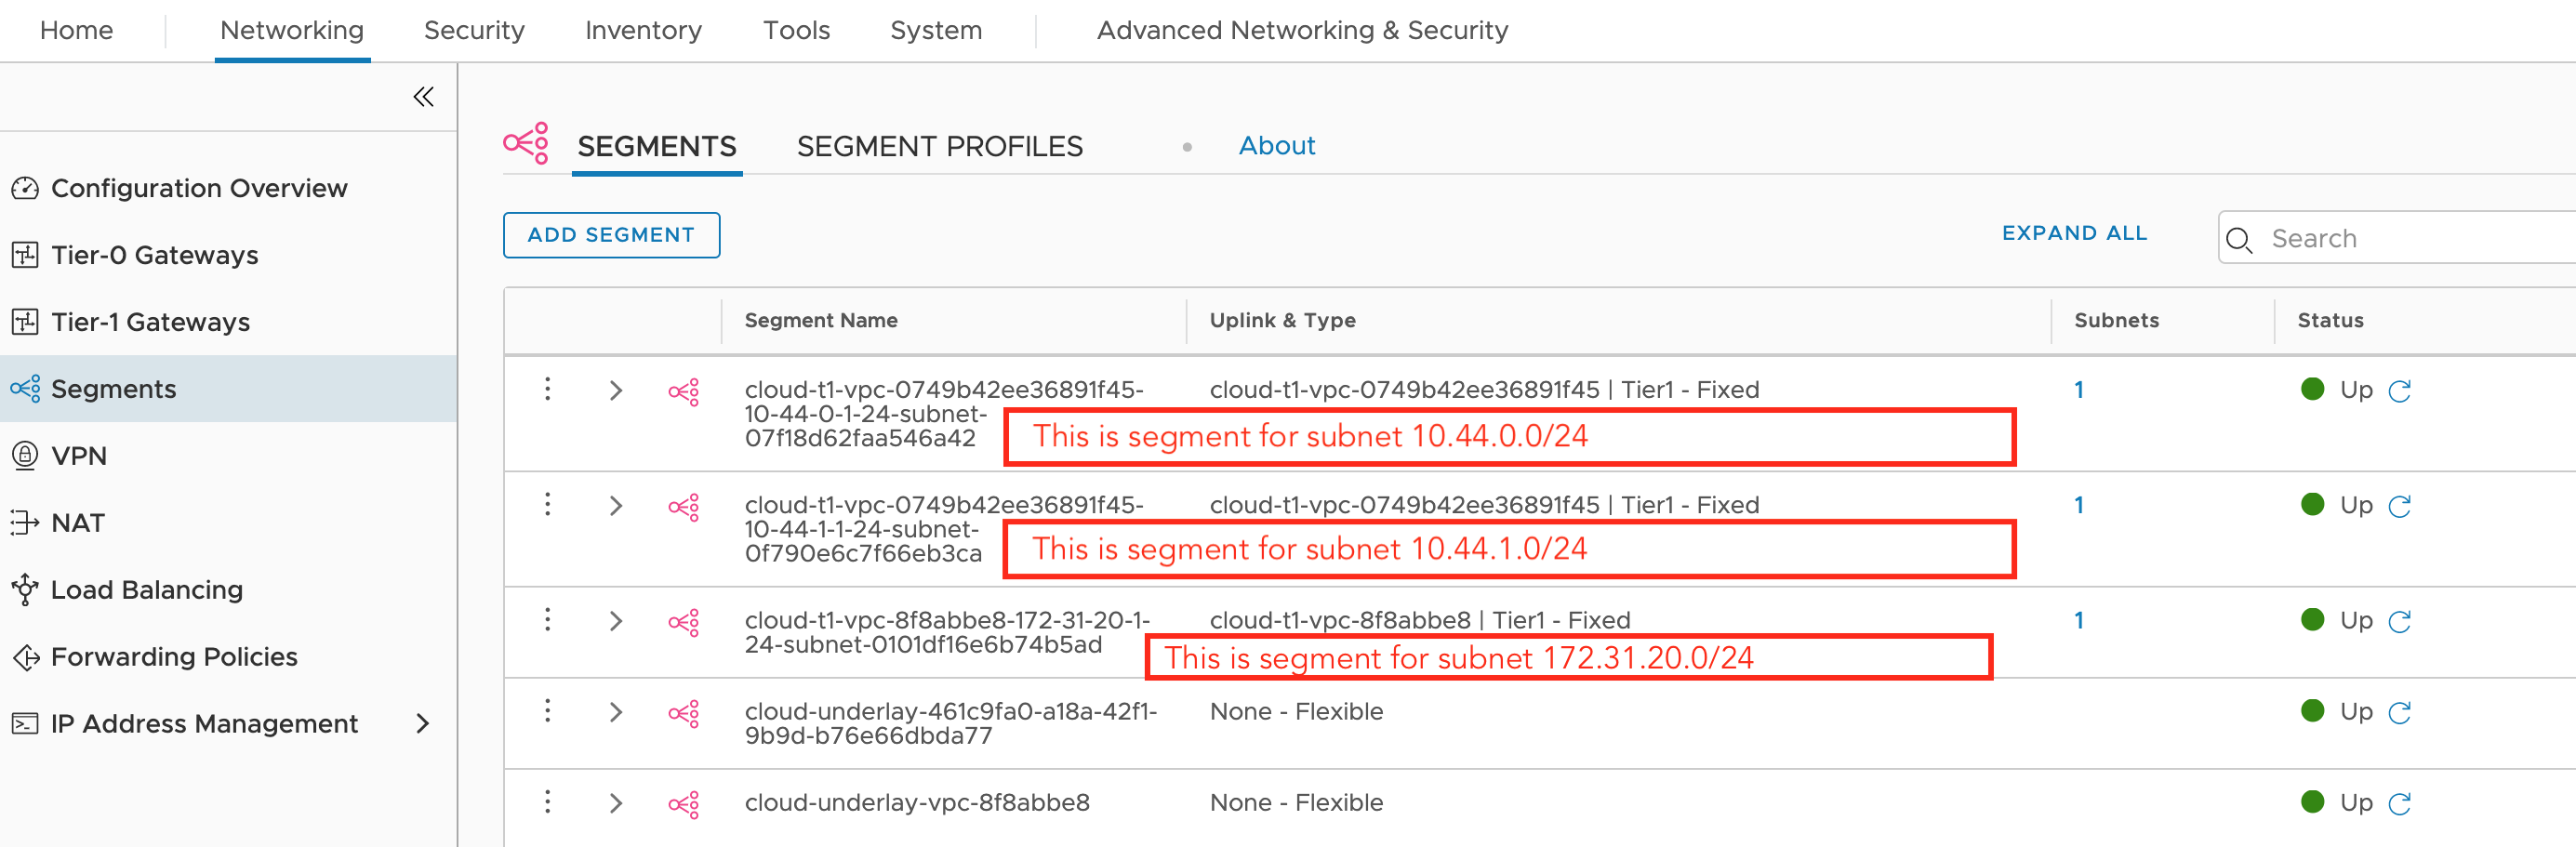 We see each subnet has its own segment
 - Go to Tier-1 Gateways
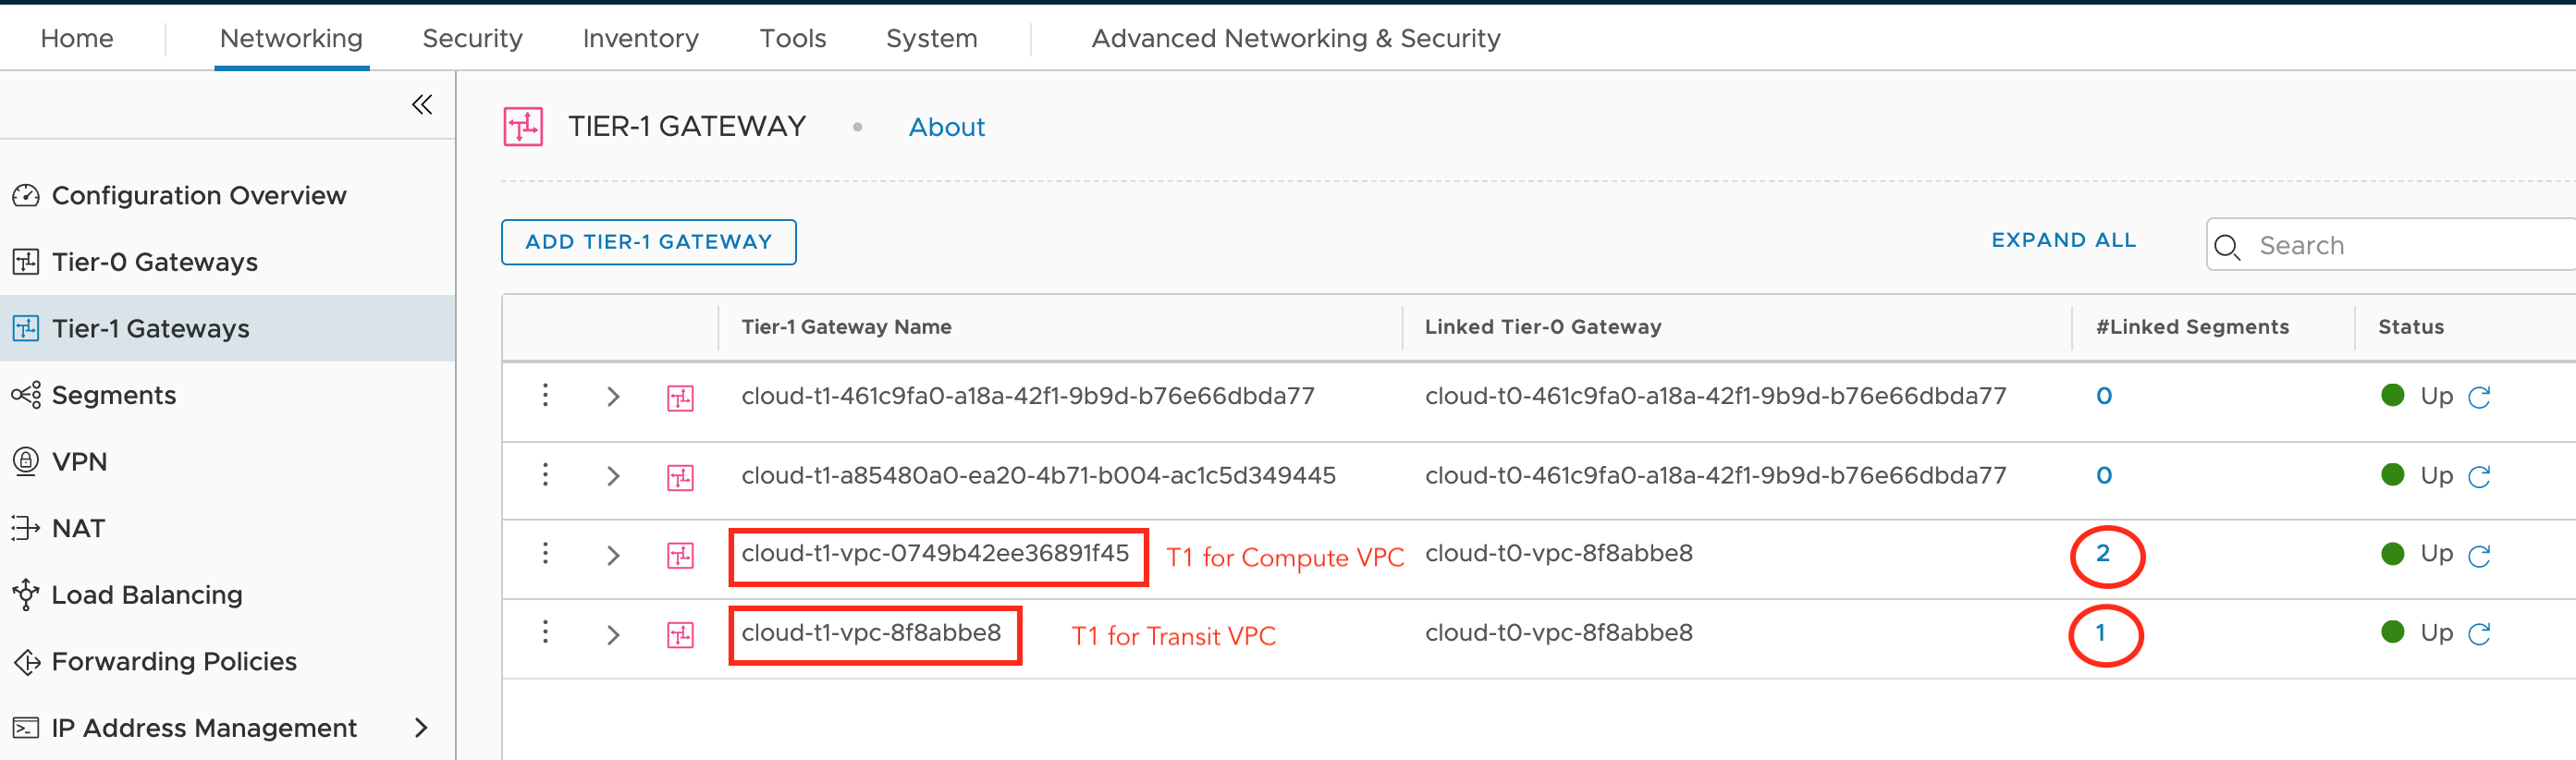 Each VPC has Tier-1 Gateway that is connected to those segments
Now let’s review and do the same for Azure. We will spin up one VM in each VNET and then install NSX Tools(agent). Then we will use the third VM as our jumphost and also DNS forwarder. Why do we need a DNS forwarder? Remember how in AWS, during PCG installation new private zone (vmware.local) has been created where we had an entry for PCG. That’s the way of resolving PCG/NSX Gateway ip address during NSX Agent/Tools installation.
In Azure there no concept of private DNS zones yet. It is currently as of the writing of this post in preview mode. Since the feature is not generally available for the public to use, we will have to use some other methods. The easiest way is to spin up VM that will be used as DNS forwarder. So when workload will try to resolve the hostname of PCG, the request will be forwarded to our DNS VM, which will in it’s turn forward request to Azure provided DNS servers, where entry about PCG can be retrieved.
- Install two CentOS VMs in Azure: one will be in Transit VNET, another VM will be in computing VNET. The third VM will have Ubuntu installed and will be used as jumpbox/DNS also in transit VNET where PCG resides.

- Let’s connect to our jumpbox and verify basic reachability towards other VMs

- Before installing NSX Tools, we will need to setup DNS on our jumpbox machine.
install bind9 package
sudo apt-get install bind9 bind9utils bind9-doc -y sudo echo ‘OPTIONS=“-4 -u bind”’ | sudo tee –append /etc/default/bind9
modify /etc/bind/named.conf.options to include the following
—
listen-on { 172.30.20.6 ; }; # This is IP address of jump box
recursion yes;
allow-recursion { trusted ;};
forwarders { 168.63.129.16;}; # This is default Azure provided DNS server where all requests will be forwarded to
forward-only;
allow-transfers {none;};
acl “trusted” { 10.55.0.0/16; 172.30.0.0/16};
—-
sudo service bind9 restart - From jump box since this is in the same VNET, we should be able to resolve ip address of PCG/NSX Gateway.
nslookup nsx-gw1
Server : 168.63.129.16
Address : 168.63.129.16#53
Name: nsx-gw1.ucpryrukuhyufg23w3xgnw40oh.dx.internal.cloudapp.net
Address: 172.30.10.4 - Now login to Compute VM and try to resolve ip address of PCG/NSX Gateway
nslookup nsx-gw1.ucpryrukuhyufg23w3xgnw40oh.dx.internal.cloudapp.net
Server : 168.63.129.16
Address : 168.63.129.16#53
** server can’t find nsx-gw1.ucpryrukuhyufg23w3xgnw40oh.dx.internal.cloudapp.net: NXDOMAIN
This is expected. Now try to use DNS forwarder IP address that we setup.
nslookup nsx-gw1.ucpryrukuhyufg23w3xgnw40oh.dx.internal.cloudapp.net 172.30.20.6
Server : 172.30.20.6
Address : 172.30.20.6#53
Non-authoritative answer:
Name: nsx-gw1.ucpryrukuhyufg23w3xgnw40oh.dx.internal.cloudapp.net
Address: 172.30.10.4
This is enough to start the installation of NSX Tools(Agent) - Login to CSM and navigate to Clouds–>Azure–>VNETs. Choose Transit VNET. Expand on “Agent Download & Installation”
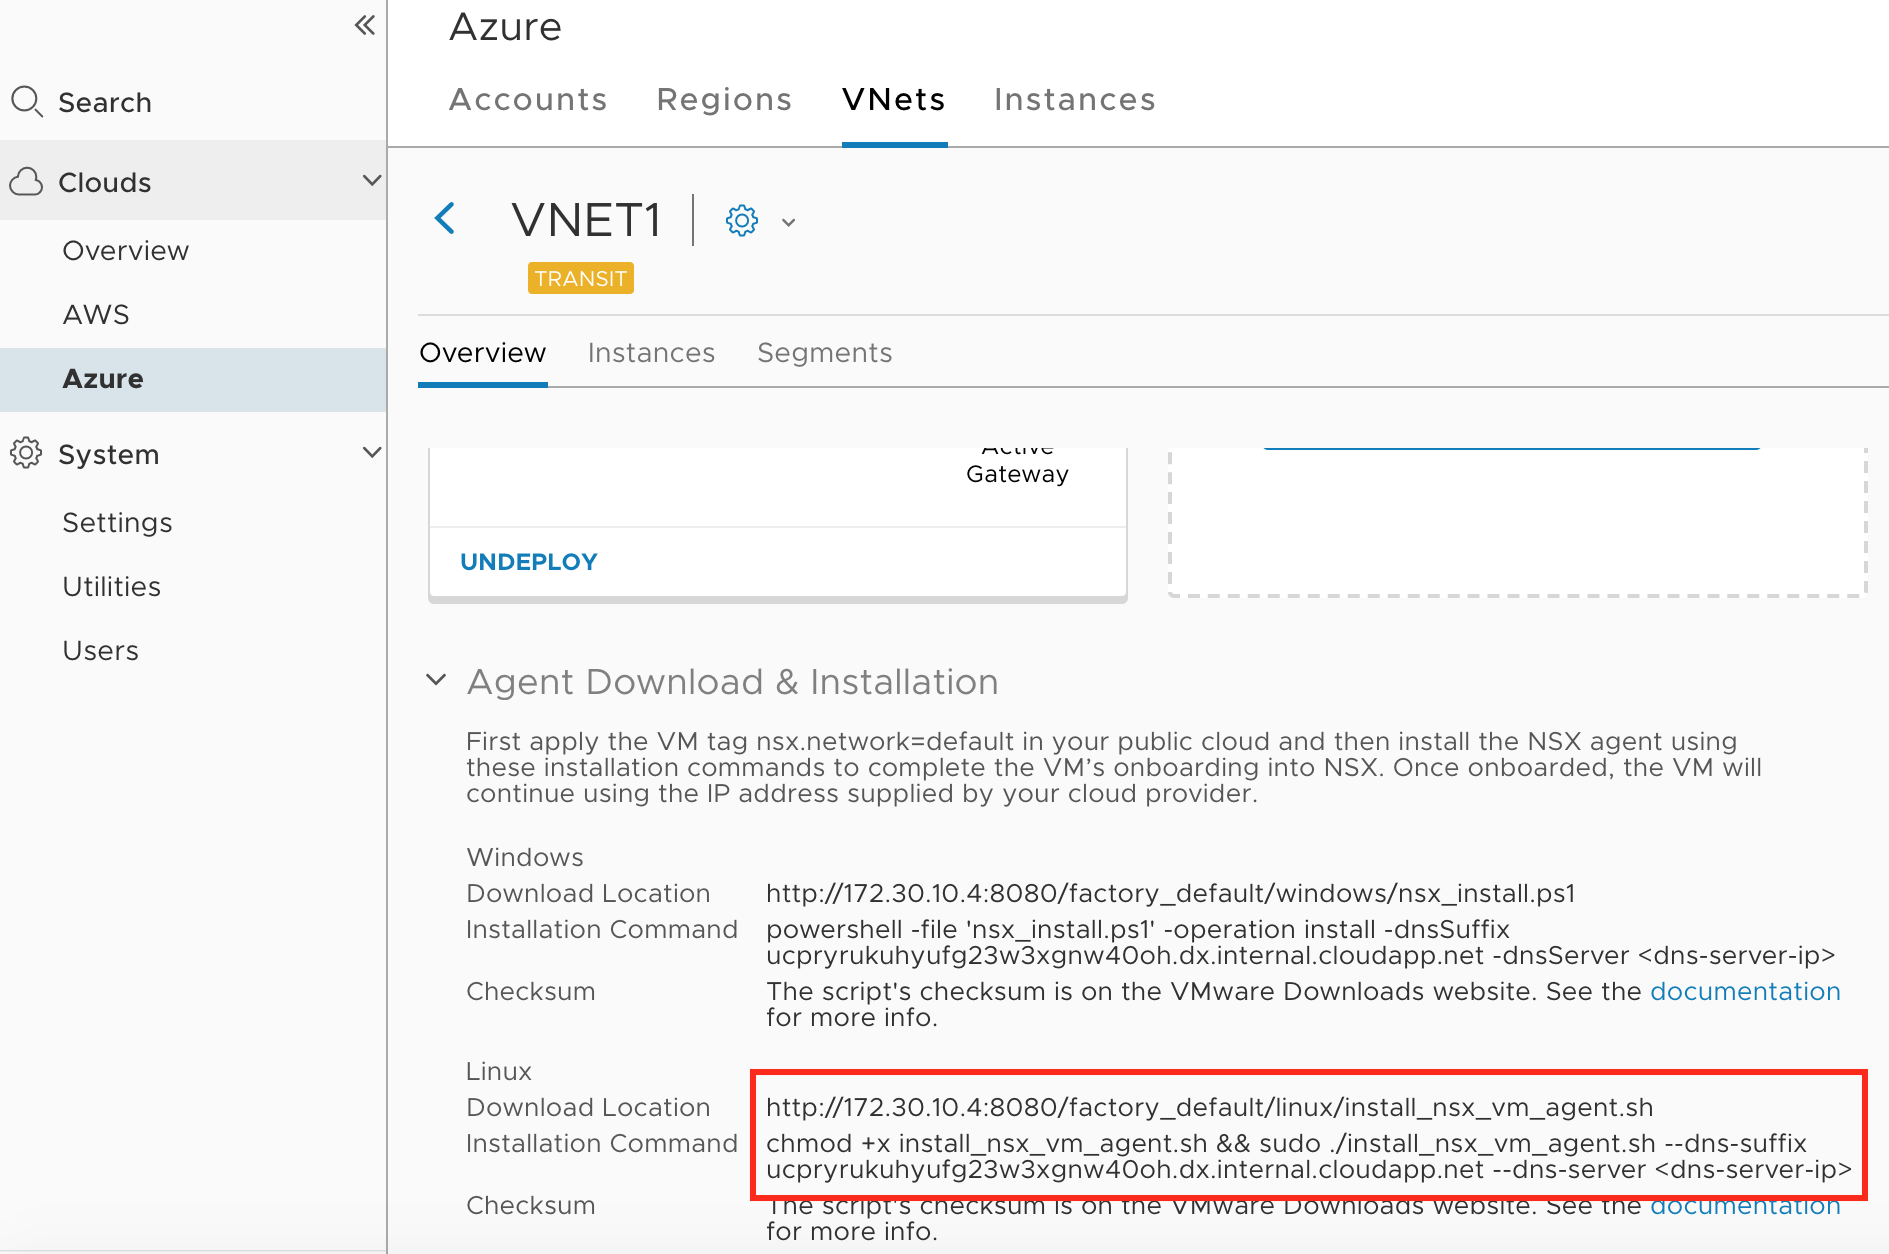 Note installation has dns-server option, where we have to indicate our DNS forwarder 172.30.20.6
 - Copy download URL and login onto each VM (Compute and Transit) to start the downloading and installation process. For CentOS, Selinux must be disabled or set into permissive mode before installation. Once the download completes, the SSH session will be disconnected. Login back to CSM and confirm that VM now shows as managed
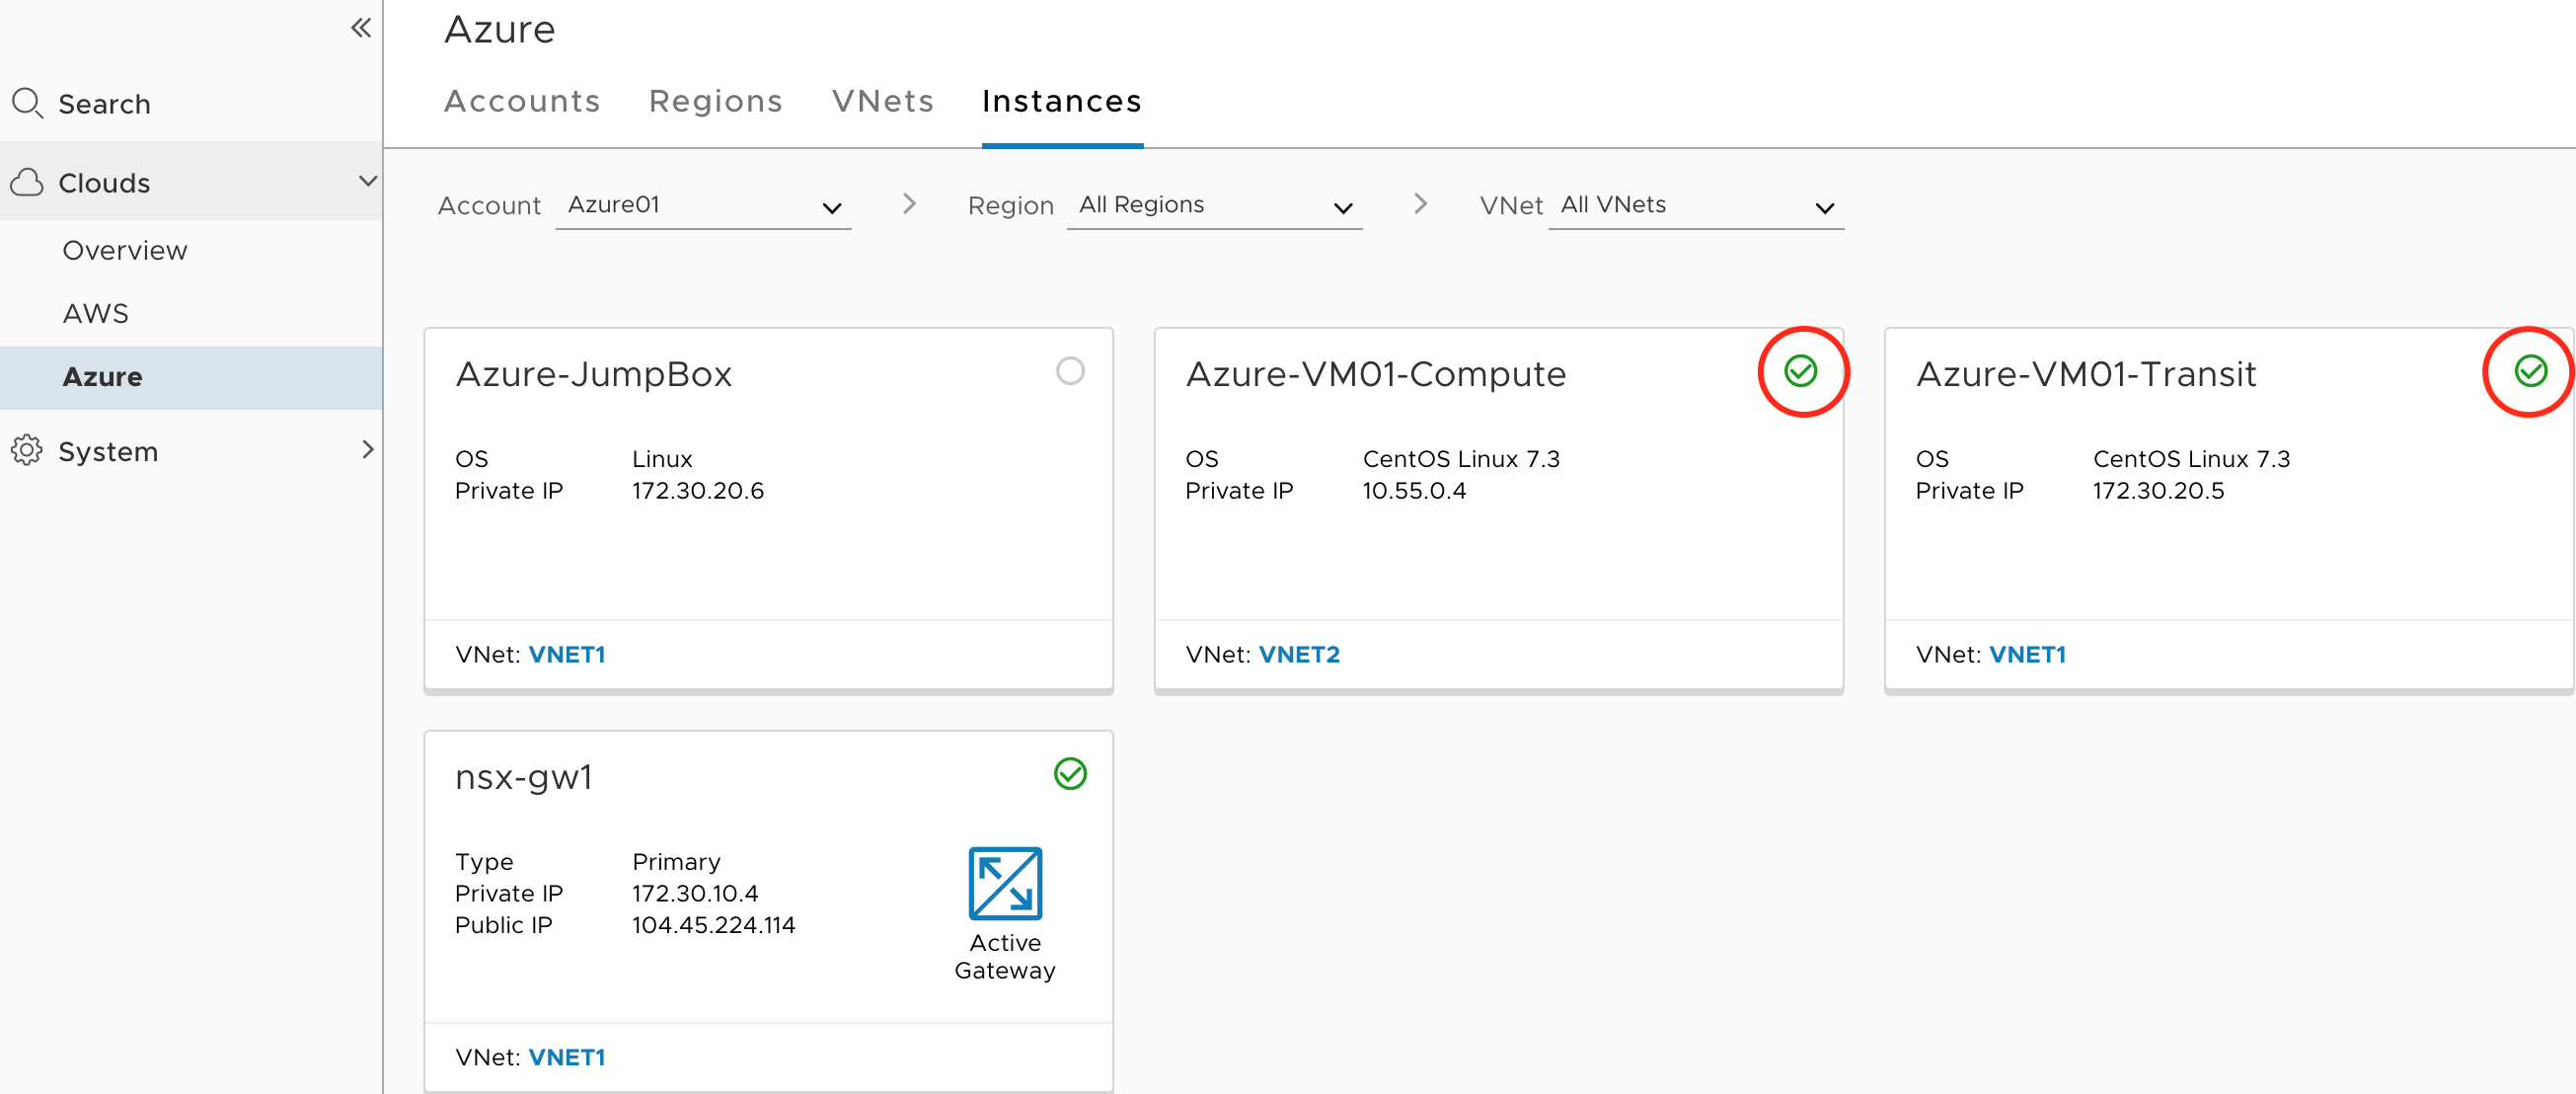 Note that Azure has the option to enable Automatic installation of NSX Agent(Tools), which is enabled under each VNET. This may or may not be desirable depending on what are you trying to do. If this option is enabled, then all you need to do is assign appropriate tag and VM will be managed

- Let’s login to NSX-T Manager and verify what objects do we have now. Navigate to Inventory–>Virtual Machines
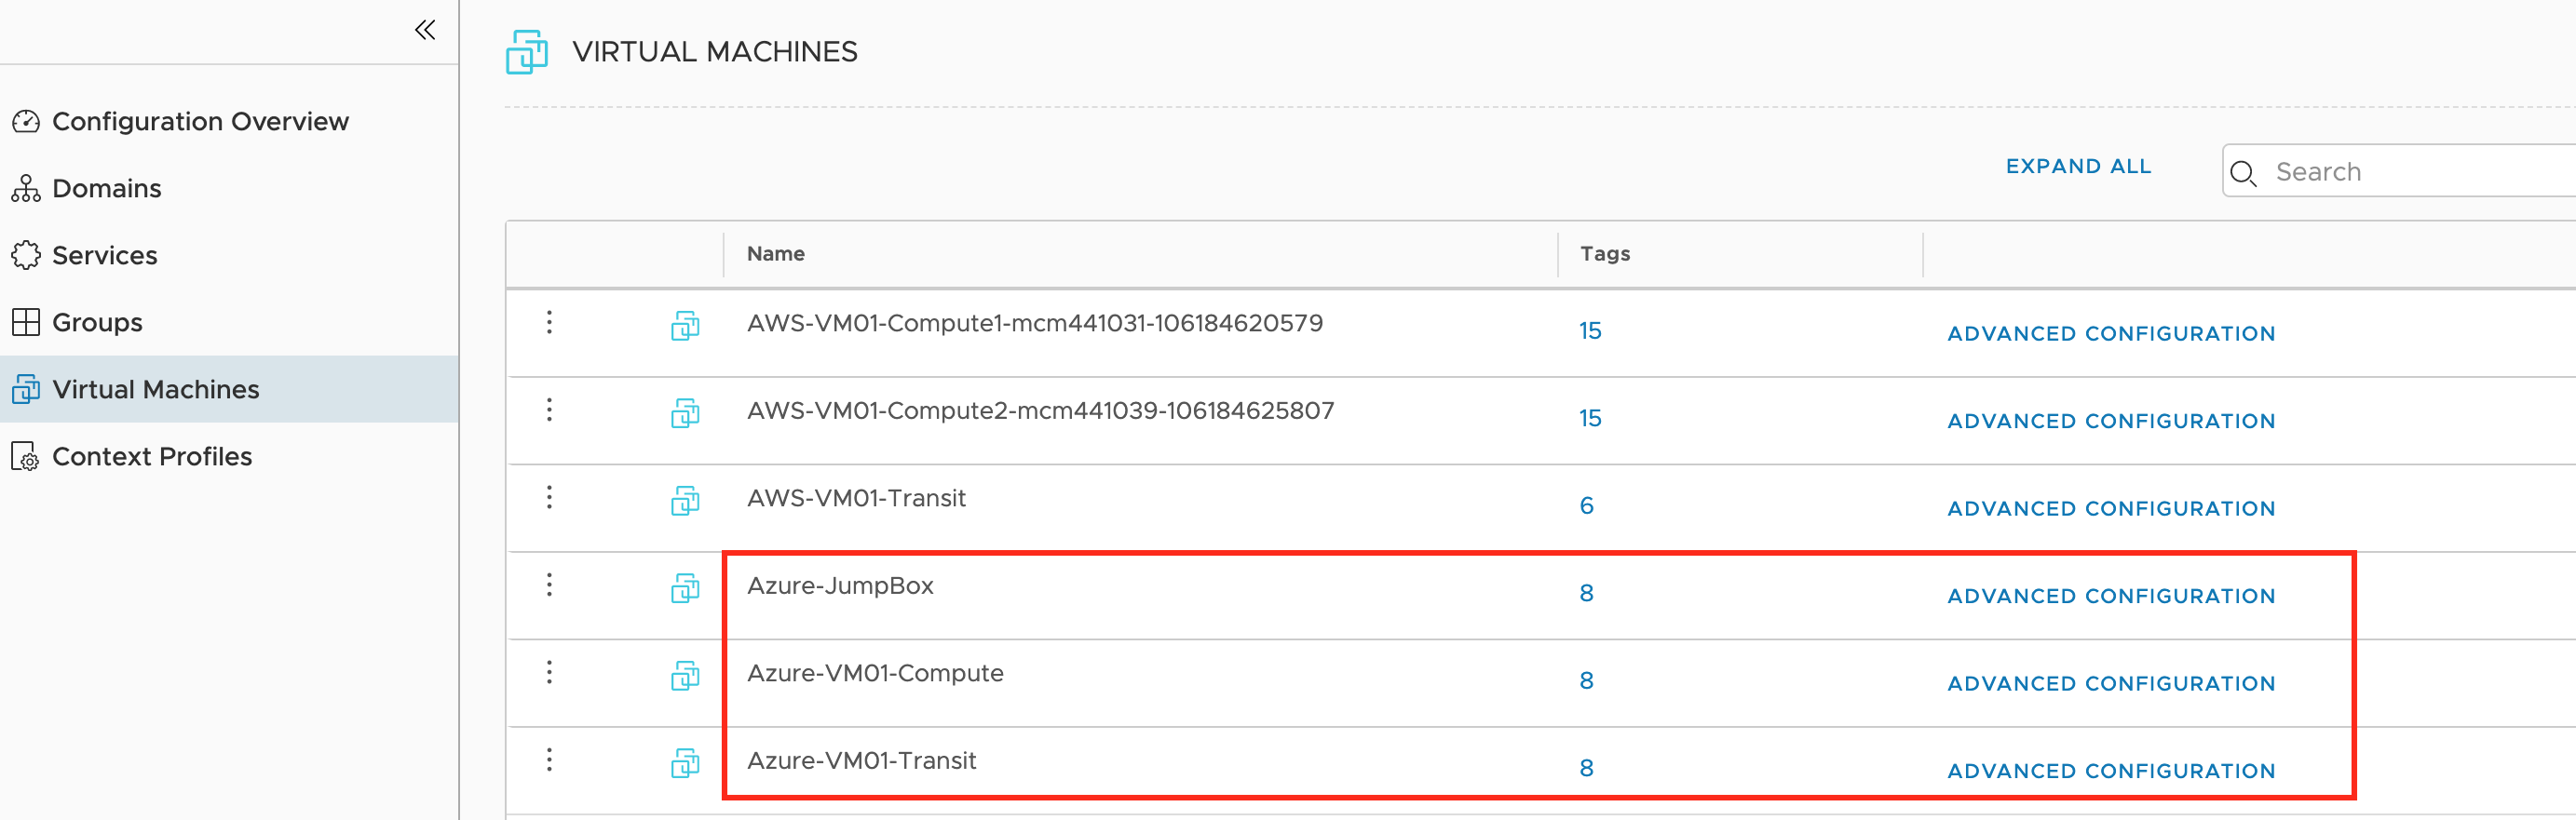
We see all Azure workloads that have a tag (nsx.network=default) - Go to Networking–>Segments
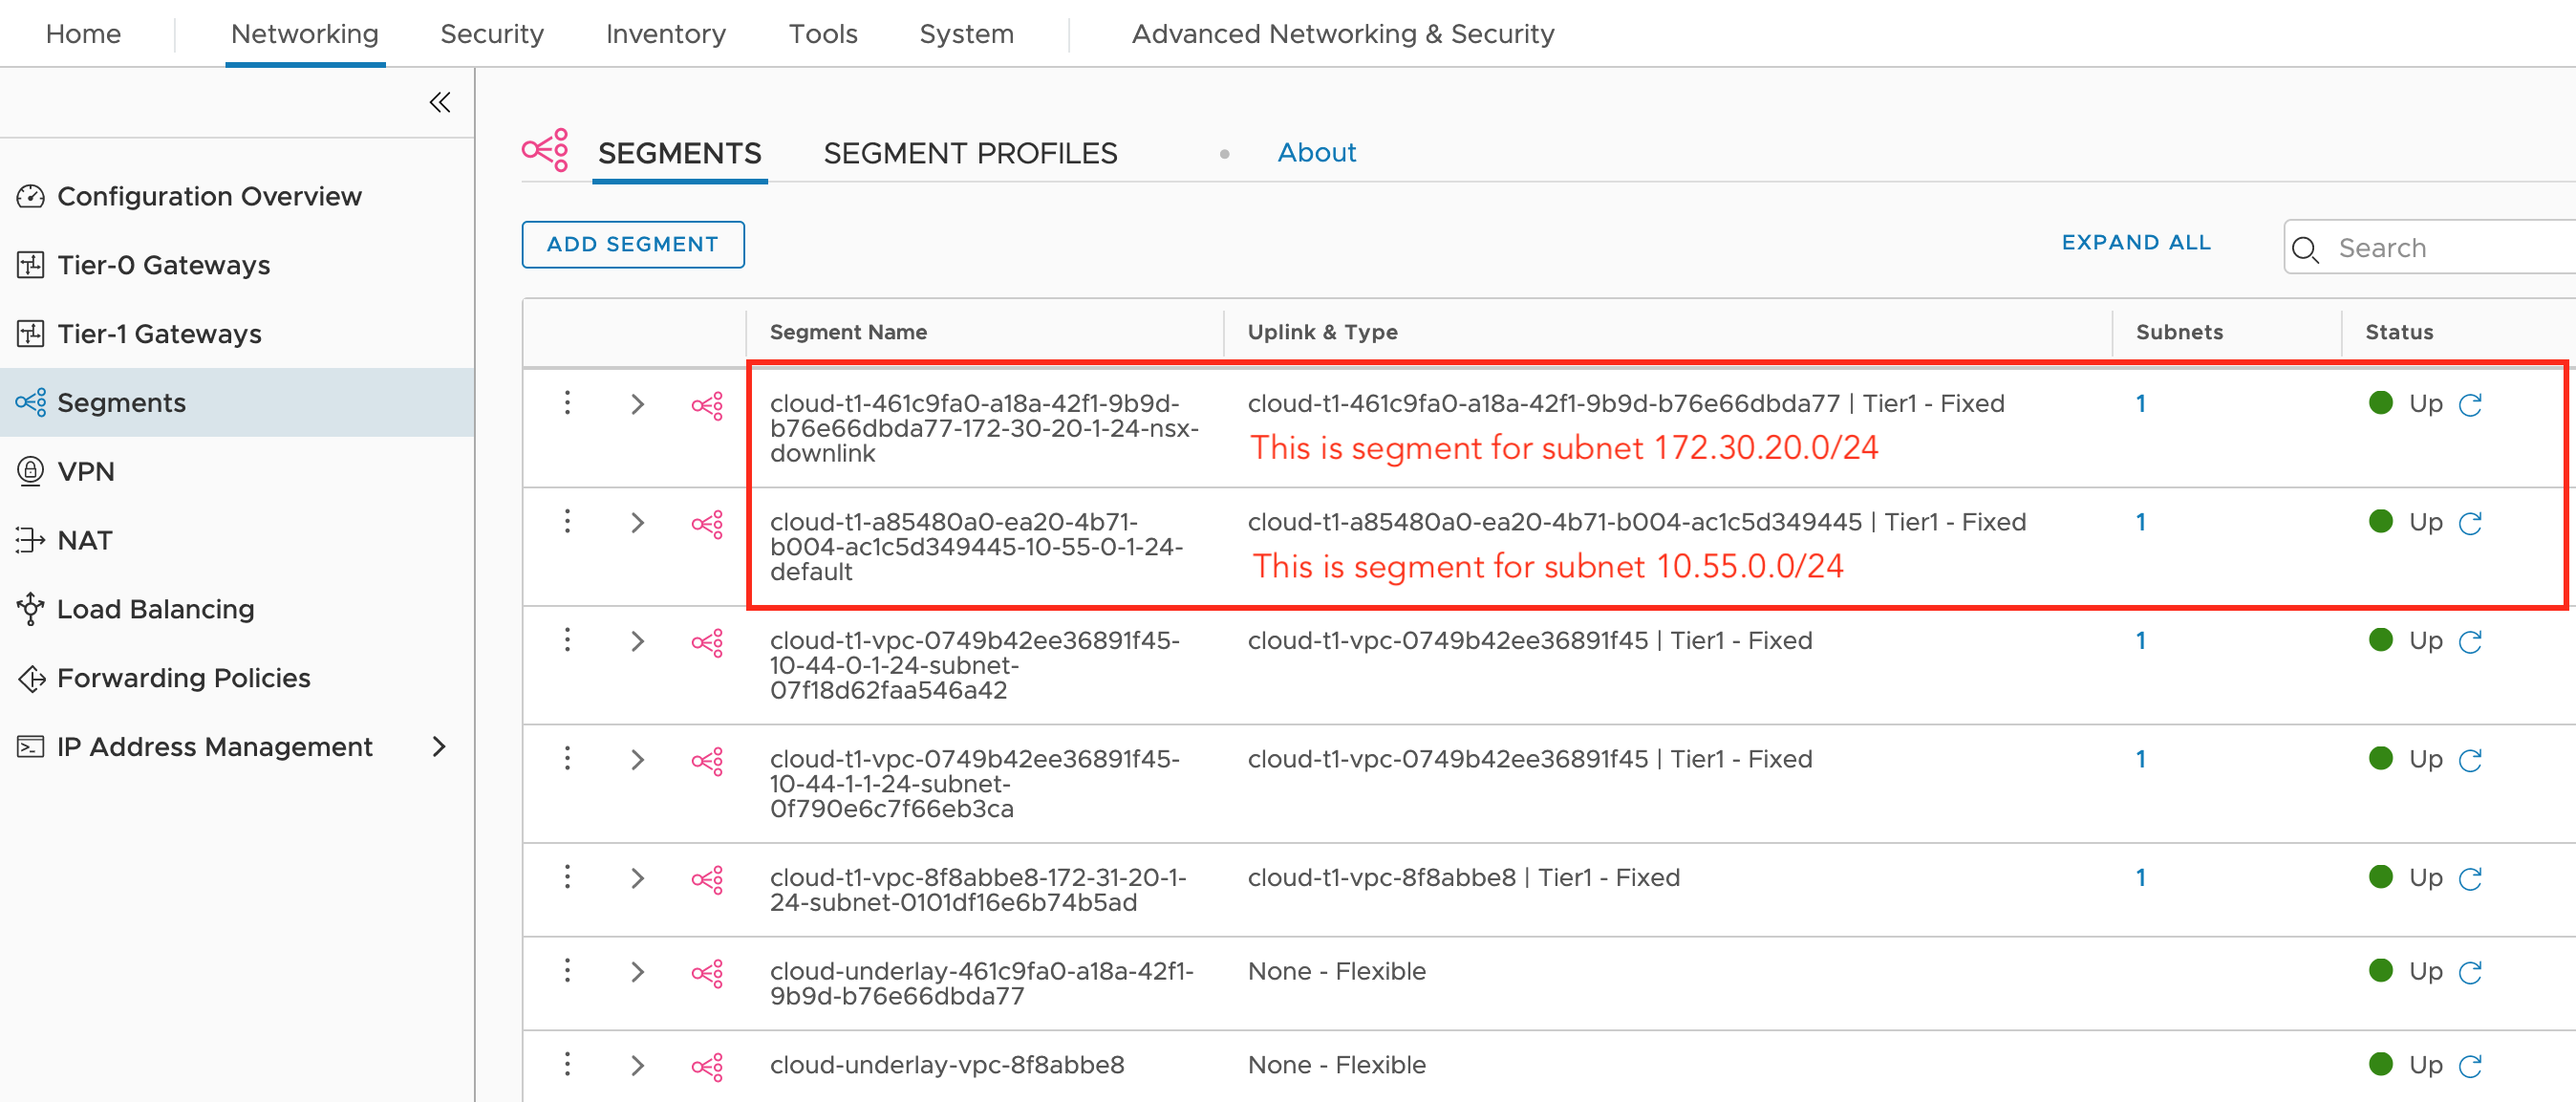
We see each subnet has its own segment - Go to Tier-1 Gateways
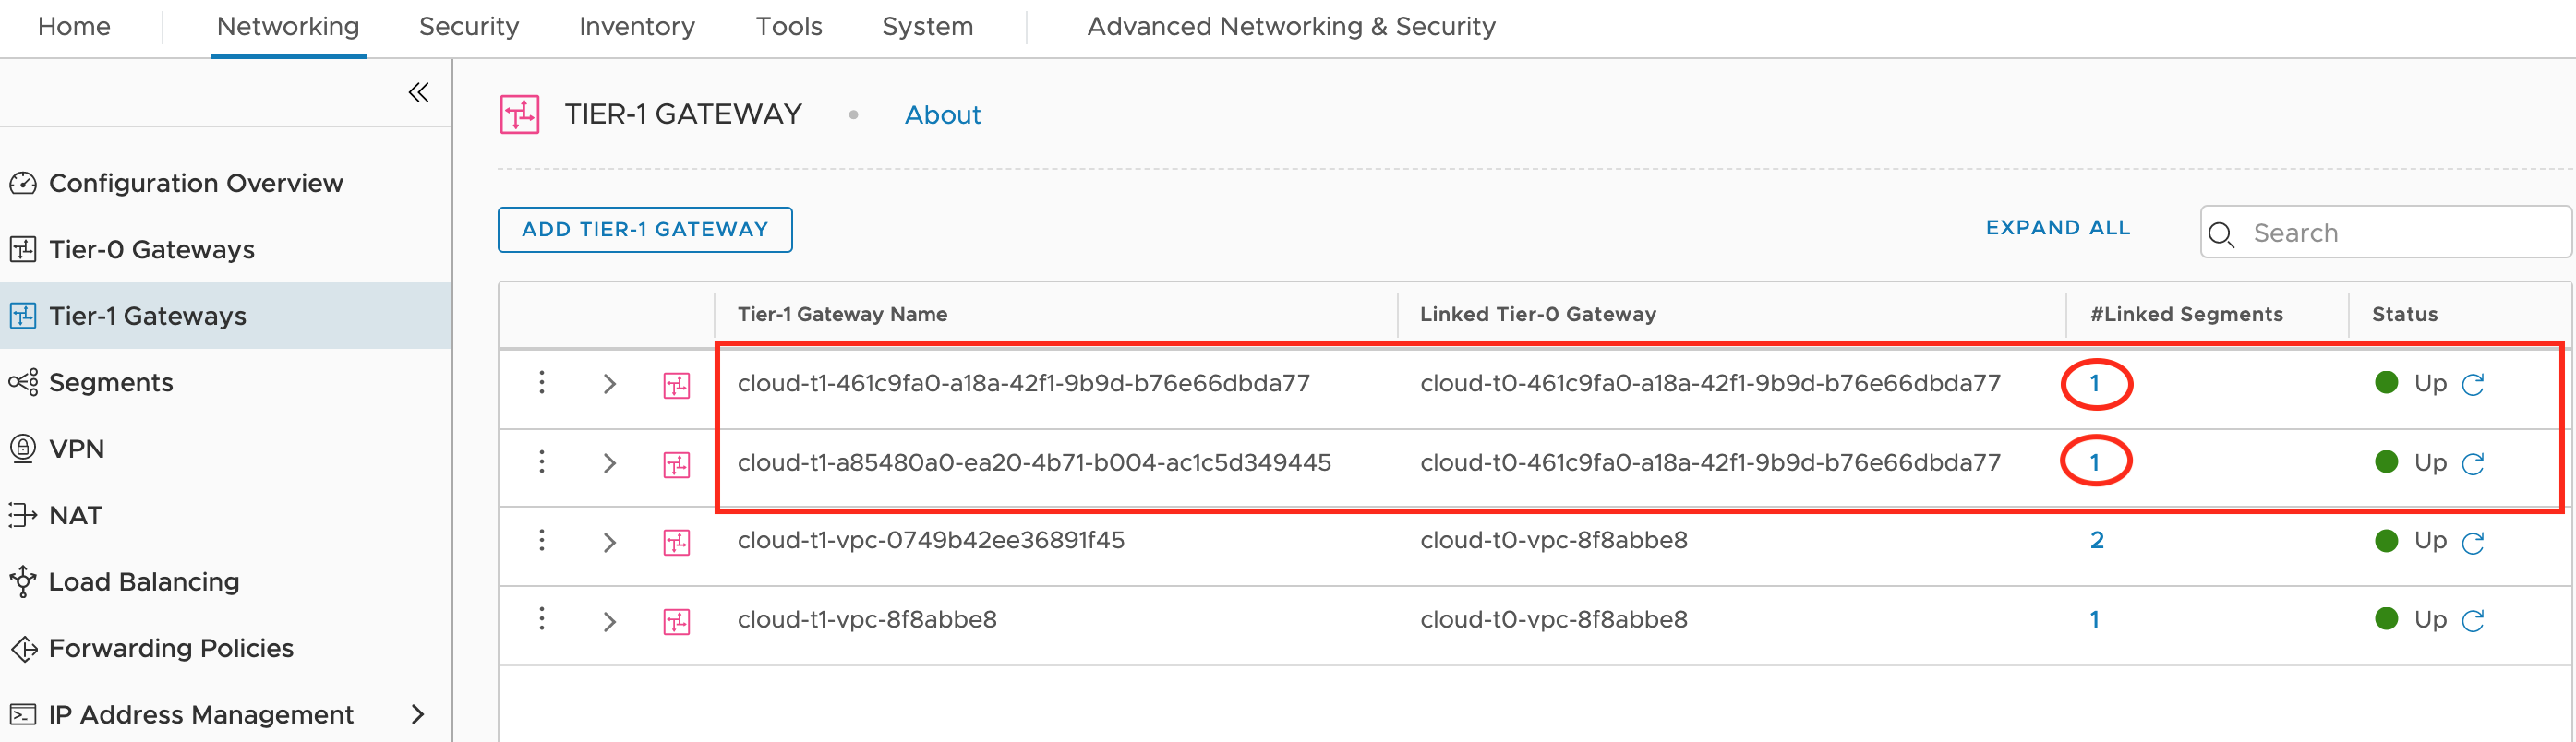 Each VNET has Tier-1 Gateway that is connected to those segments
This concludes the workload onboarding process where we have successfully created VMs in both AWS and Azure, tagged them and installed NSX Tools(Agent). The next part will be dedicated to networking and security for our public VMs. Stay tuned…
Author- Nizami Mammadov CCIE#22247, VCAP-NV

Comment (1)
AdrianoBED
Truly tons of awesome knowledge!